• DIY
    • Crafts
    • Woodworking
  • Home Improvement
    • Home Building & Design
    • Decorating
    • Remodeling
    • Furnitures
    • Bedroom
    • Kitchen
    • Bathroom
    • Floors
    • Real Estate
  • Gardening
    • Landscaping
  • Finance
TimewornLit.com
  • DIY
    • Crafts
    • Woodworking
  • Home Improvement
    • Home Building & Design
    • Decorating
    • Remodeling
    • Furnitures
    • Bedroom
    • Kitchen
    • Bathroom
    • Floors
    • Real Estate
  • Gardening
    • Landscaping
  • Finance
Featured of Stripping Wood Antiques the Fast and Easy Way
  • DIY
  • Woodworking

Stripping Wood Antiques the Fast and Easy Way

  • September 1, 2019
  • 3 minute read
  • Perla Irish

Here is an easier way to make removing old paint and varnish less of a chore thanks to a history buff who appreciates the value of old wooden furniture.

Save Time and Money Refinishing Wooden Furniture with this Great Tips

Many Do-it-Yourself articles begin by asking the reader to consider whether or not they have the time and patience required to complete a tedious project. In the 30 years that John Van Noort has been refinishing furniture as a hobby, he has developed a labour-saving technique to speed up that craft without compromising on efficacy.


Read Also:

  • How to Bring Life to Old Wood Paneling Cheaply & Easily
  • How to Paint Over Stained and Varnished Wood Paneling
  • How to Distress Furniture Easily
  • Basic Carpentry Tools and Tips

The Toronto born historian’s material of choice is wood. Van Noort says he still follows the advice he was given decades ago.

“A boss once said to me, ‘If you buy furniture, only buy something made out of solid wood, even if you have to wait, because it will always hold its value; it’s a good investment,‘ and I’ve always remembered that. I wasn’t in his league financially, so I couldn’t buy wooden furniture new. I’m a history buff so I’ve always been interested in anything antique, so I always bought pieces that needed to be refinished.”

Van Noort hastens to add that resurfacing wooden furniture isn’t always the way to go.

“If it has the original finish and it’s in good shape, you don’t want to touch it, as that would decrease the value.“

If, however, he says you come upon a great wooden dresser, table, or cabinet, for instance, and it has a number of coats of paint, you may be able to recover a potential money-maker that no-one else wants to tackle.

“A lot of people get discouraged after trying expensive paint strippers that take so long and are very labour intensive,” he notes. “People shouldn’t give up with a bad experience on their conscience.“

The Central Ontario resident offers the following advice for a much easier way to increase the value of wooden treasures.

Forget expensive, difficult to use paint and varnish removers, he says. Household oven cleaners do the trick at a fraction of the cost in a fraction of the time and can be just as effective. Oven Cleaners can be sprayed on as opposed to being brushed on, eliminating at least one step in the application process. Such products are fast-acting, removing paint and varnish very quickly, and keeping exposure to toxic gases to a minimum.

The Materials Required

Equipment/materials required for faster paint/varnish removal from wood:

  • Heavier grade rubber kitchen glove which extends up the forearm
  • Newspapers or other protective material
  • Oven cleaner (spray format)
  • Paint scraper and/or non-scratching putty knife
  • Small brass or wire brush
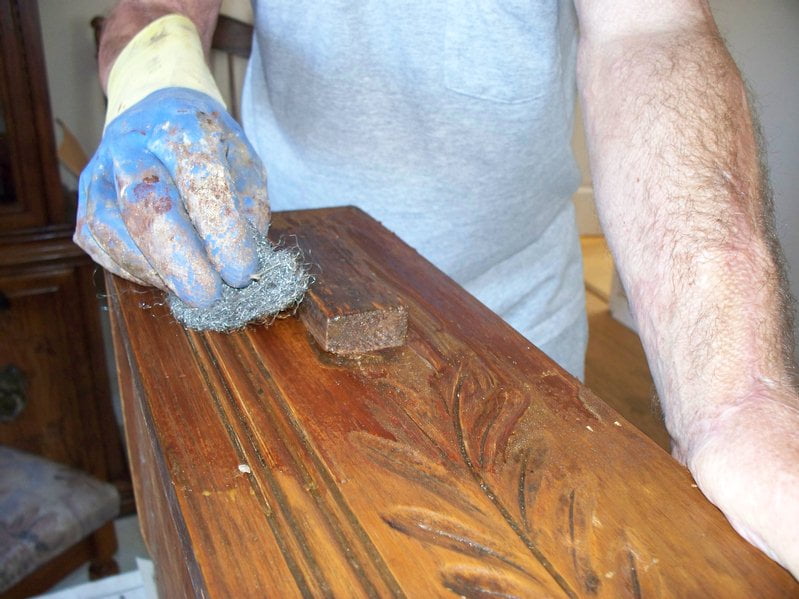
  • Medium grade steel wool
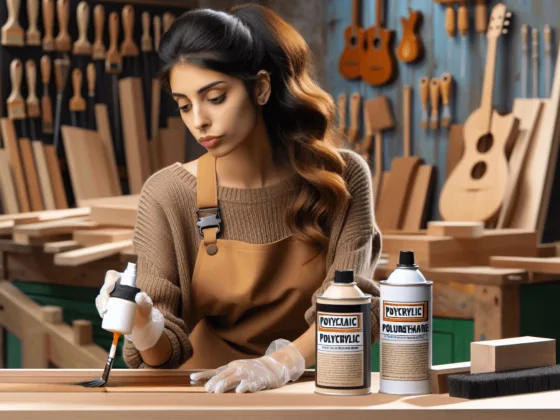
  • Final finishing material (ie. stain or urethane), thinner and brush(es) if required

Easy Stripping and Refinishing Steps

  1. Lay newspapers or other protective material on the floor or other work surfaces
  2. Ensure adequate ventilation
  3. Remove any fabric, hardware, doors and drawers from the furniture being worked on
  4. Spray oven cleaner on an area about 24″ x 24″ (60 cm X 60 cm) following all safety instructions on the product labelling.
  5. Wait for 5 – 10 minutes, depending on the thickness of the paint or varnish, or until the surface starts to bubble up or discolour.
  6. Using a paint scraper or putty knife, gently but firmly graze the old finish off the area of the application being careful not to scratch the wood. This process may have to be repeated in the same area if there are several layers of paint or finish.
  7. Difficult to reach cracks or crevices can be reached with small brass or wire brush (which won’t damage the wood)
  8. Perform a final cleaning with medium grade steel wool. Again spray the scraped area with oven cleaner.
  9. Rub the wetted area with the steel wool, applying pressure until the area is dry and clean.
  10. Now that you can see the bare wood you can decide how you want it to look. If you wish to change the colour or hue, apply a stain according to the manufacturer’s instructions.
  11. Once the entire piece is clean, dry and ready, brush or spray on a matte or low gloss clear coat (urethane or similar finish). If brushing, use a high-quality fine paint style brush. Thin the clear coat with a very small ratio of appropriate thinner, if practical. This will help it to flow more easily, lessening any brush marks which may appear.
Total
0
Shares
Share 0
Tweet 0
Pin it 0
Perla Irish

Perla Irish, who is more familiarly known as Irish, is the Content Manager at timewornlit.com. She loves following trends around home and garden, interior design, and digital marketing. Through this blog, Irish wants to share information and help readers solve the problems they are experiencing.

Related Topics
  • furniture
  • paint
  • repair
  • tips
  • woods
Previous Article
Featured of How to Paint Over Stained and Varnished Wood Paneling
  • DIY
  • Home Improvement
  • Woodworking

How to Paint Over Stained and Varnished Wood Paneling

  • August 31, 2019
  • Perla Irish
View Post
Next Article
Featured image - DIY Woodworking 101 - The Fundamentals of Starting a Home Based Woodworking Hobby
  • DIY
  • Woodworking

DIY Woodworking 101: The Fundamentals of Starting a Home Based Woodworking Hobby

  • September 12, 2019
  • Perla Irish
View Post
You May Also Like
Repair scratches on Formica countertops
View Post
  • DIY
  • Home Improvement
  • Kitchen

Expert Guide to Repairing Formica Countertops at Home

  • Nugroz Stone
  • January 20, 2025
Transform wood scraps into a coffee spoon and bag clip!
View Post
  • Home Improvement
  • Woodworking

Craft the Perfect Coffee Bag Clip: A Woodworking Project for Beginners

  • Perla Irish
  • December 24, 2024
An infinity mirror that reflects beautiful lights
View Post
  • Crafts
  • Decorating
  • DIY
  • Home Improvement

Create Your Own Infinity Mirror for Home Decoration

  • Perla Irish
  • November 20, 2024
Modern bedroom design with a cozy feel.
View Post
  • Bedroom
  • DIY
  • Home Improvement

Future Trends in Bedroom Design: What You Can DIY for Tomorrow’s Look

  • Perla Irish
  • November 18, 2024
A woodworker applying a clear finish to a wooden surface in a bright workshop filled with various woodworking tools and wood pieces, with polycrylic and polyurethane products displayed on the workbench, showcasing her craftsmanship and the beauty of finished wood.
View Post
  • Home Improvement
  • Woodworking

Polycrylic vs. Polyurethane: Which Is Better for Your Wood Project?

  • Perla Irish
  • October 26, 2024
A 3D rendered image of measuring a window with a tape measure, showcasing their teamwork and focus. Nearby, a table is filled with various tools, including a level and a square. The background features a cozy and inviting home interior, enhancing the warm atmosphere of the scene.
View Post
  • DIY
  • Home Building & Design
  • Home Improvement

How to Measure Existing Windows for Replacement Like a Pro

  • Perla Irish
  • September 7, 2024
A woodworker uses hand tools to meticulously carve intricate details into a wooden cabinet, with sawhorse support and wood dust in the air.
View Post
  • DIY
  • Furnitures
  • Home Improvement
  • Kitchen
  • Woodworking

How to Build a Cabinet Box in 5 Easy Steps

  • Perla Irish
  • June 21, 2024
A carport attached to a residential house, with a vehicle parked underneath for protection from the weather.
View Post
  • Home Building & Design
  • Home Exterior
  • Home Improvement
  • Woodworking

How to Attach a Carport to a House Without Damaging the Exterior

  • Perla Irish
  • June 4, 2024

Leave a Reply Cancel reply

Your email address will not be published. Required fields are marked *

This site uses Akismet to reduce spam. Learn how your comment data is processed.

Subscribe

Subscribe now to our newsletter

  • Privacy Policy
  • Disclaimer
  • Sitemap
  • Contact
  • About

Input your search keywords and press Enter.