Table of Contents Show
Introduction
Bathroom renovation is the process of transforming an old, less functional space into a stylish, modern wet room. This renovation not only aims to improve the look of the bathroom but also focuses on making it more functional and increasing the value of the home.
The renovation process involves careful planning, design considerations, and choosing the right materials that will help create a luxurious and practical wet room.
Benefits of Bathroom Renovation
There are many benefits to renovating your bathroom:
- Improved Comfort and Usability: A well-executed transformation can greatly enhance the comfort and usability of one of the smallest spaces in your home.
- Relaxation and Well-being: By incorporating thoughtful design elements, you can create a sanctuary that promotes relaxation and well-being.
- Water Efficiency: Upgrading fixtures to facilitate better water efficiency can contribute to both environmental sustainability and cost savings.
- Personal Style: Choosing stylish tiles and finishes that reflect your taste adds character and uniqueness to the space.
Return on Investment
A renovated bathroom can also provide a significant return on investment. In today’s real estate market, potential buyers often prioritize modernized bathrooms when making purchasing decisions.
An updated wet room can not only attract buyers but also elevate the overall impression of your property, making it more competitive in the market.
Purpose of this Guide
This guide will outline a step-by-step process to assist homeowners embarking on a bathroom renovation. By understanding the stages involved, you can better navigate the challenges of remodelling, ensuring that your vision of a stunning wet room ultimately comes true.
From concept to completion, every step is crucial in creating an ideal space that combines practicality with elegance.
Demolition and Discovery: Unveiling the Bathroom’s Potential
The demolition phase in a bathroom renovation is crucial for redefining the overall space and functionality. This critical stage involves carefully removing existing bathroom fixtures, such as sinks, toilets, bathtubs, and cabinetry, to create an entirely new canvas for your wet room transformation.
Before beginning this process, thorough planning and prioritization of safety precautions must be observed. Wearing appropriate safety gear, such as gloves, goggles, and dust masks, is essential to ensure personal protection during demolition.
Understanding the Purpose of Demolition
One of the primary objectives during the demolition phase is to understand the potential of the space. As fixtures are removed, it is not uncommon to encounter unforeseen challenges, such as plumbing issues, structural damage, or hidden mould. Addressing these issues promptly can prevent larger headaches down the road.
Additionally, during demolition, you may also uncover unused or dead spaces that have been concealed behind cabinetry or outdated fixtures. These areas can often be creatively redesigned to maximize the usable square footage of the bathroom, potentially enhancing its aesthetic and functional appeal.
Importance of Documentation
It is advisable to document the existing state of the bathroom before demolition begins, ideally with photographs that can serve as a reference. This practice will not only help keep track of any damage discovered but also offer insight into design possibilities that could arise during the renovation process.
Engaging a professional contractor can further ensure that the demolition is efficient and adheres to local building codes.
Ultimately, this phase is not just about tearing down; it is a valuable opportunity to discover new potential within the existing layout, paving the way for a stunning and innovative wet room design.
Initial Plumbing and Mechanical Work
Once the renovation space is cleared, the focus turns to essential plumbing system updates. This phase is crucial for ensuring the seamless function of your wet room design. One of the primary tasks involves re-engineering the plumbing layout to accommodate the changes in fixtures and features necessitated by the transformation.
Careful planning is required to prevent future complications and ensure compliance with building codes.
1. Assessing the Need for Repiping
Repiping may be necessary, especially if the existing pipes are outdated or damaged. The decision to repipe often hinges on the condition of the current plumbing and the extent of the renovation.
Installing new pipes can enhance water flow and decrease the likelihood of leaks, which is vital for a wet room environment. As you consider repiping, it is pivotal to select appropriate materials that can withstand constant exposure to moisture.
2. Ensuring Proper Drainage with Flooring Slopes
In addition to repiping, attention must be given to the drainage slopes in the flooring. Proper drainage is essential in a wet room, as it facilitates water flow toward drainage points and minimizes the risk of pooling.
Achieving the right slope requires precise measurements and attention to detail. The typical slope recommendation is approximately 1-2%, ensuring effective drainage without compromising the aesthetics of the space.
3. Potential Relocation of HVAC System
Another critical aspect of the plumbing and mechanical work is the potential relocation of the HVAC system. If the current layout does not adequately support the design changes, adjustments to the HVAC system may be required.
This can involve moving vents to new locations or upgrading components to enhance ventilation. Maintaining air quality and comfort in the wet room is paramount, making effective HVAC planning an integral part of the renovation process.
Preparing for the Curbless Shower
When renovating a bathroom and designing a curbless shower, careful planning is essential. Here’s what you need to know:
Recessing the Subfloor
The first step is to lower the subfloor in the shower area so that it is below the level of the surrounding bathroom floor. This creates a smooth transition between spaces and enhances the look of the wet room. It also eliminates barriers to easy access, which is especially helpful for people with mobility challenges.
Benefits of a Curbless Shower Design
A curbless shower design offers several advantages:
- Accessibility: Without a traditional curb, there is less chance of water spilling outside the shower area, reducing the risk of slips and falls.
- Easy Cleaning: The absence of a ledge makes cleaning easier as you can reach all surfaces without any obstructions.
- Aesthetic Appeal: A curbless shower creates a modern and open feel in the bathroom, making it visually appealing.
Proper Drainage System
When preparing for this type of shower, it’s crucial to ensure that the drainage system is well-designed to accommodate the lower height of the shower base. This will prevent water from accumulating and maintain proper drainage.
Waterproofing Measures
During the renovation, it’s advisable to incorporate proper waterproofing measures to avoid future structural issues. Here are some steps you can take:
- Seal the subfloor thoroughly.
- Use high-quality, water-resistant materials.
These precautions will help prolong the life of your wet room.
Seeking Professional Advice
Homeowners should consider consulting with professionals who have experience implementing curbless shower designs. Their expertise can ensure optimal results and help you avoid common pitfalls.
Visual Resource for Guidance
If you’re interested in seeing how a curbless shower is prepared, there’s a detailed video available that showcases the step-by-step procedures involved. This visual resource can provide valuable insights into techniques and considerations for a successful bathroom renovation.
Constructing the Wet Room Structure
The construction of a wet room involves several critical steps that ensure a durable and functional space.
1. Subfloor Preparation
The first step is subfloor preparation, which requires removing old flooring and assessing the existing structure for moisture issues. A clean and level subfloor is essential for proper tile adhesion.
If necessary, a waterproof membrane should be installed to prevent moisture from rising through the subfloor, as this will significantly enhance the room’s longevity.
2. Wall Framing
Following subfloor preparation, the next phase is wall framing. It is crucial to use moisture-resistant materials for framing, especially in wet environments. Built-in wall niches can be created during this stage for added functionality and aesthetic appeal.
These niches not only provide convenient storage for toiletries but also contribute to the overall design of the wet room, making it visually appealing without compromising on space.
3. Plumbing Layout Considerations
Moreover, consideration must be given to the plumbing layout. Specifically, for areas that experience cold weather, it is vital to implement proper insulation techniques. This may involve mounting pipes on insulated supports or utilizing heat tape to prevent freezing.
Attention must also be paid to the location of drains, ensuring that water flows away efficiently without pooling, which is a significant concern in wet room constructions.
4. Integration of Floating Vanity
Lastly, the integration of a floating vanity can optimize space and enhance functionality. This installation requires a dedicated support wall built into the framing to securely anchor the vanity above the floor level. Such thoughtful design solutions contribute to both the aesthetic and practical aspects of the wet room while maintaining ease of access for plumbing adjustments in the future.
By adhering to these construction principles, homeowners can achieve a stunning wet room that is not only beautiful but also structurally sound.
Finishing Touches: Tiling, Fixtures, and Final Details
The completion of a bathroom renovation, particularly in a wet room setting, relies heavily on the careful selection and installation of tiles and fixtures. A key component of this process is the use of waterproof membranes, which play a critical role in preventing water damage and ensuring the longevity of the installation.
These membranes should be applied seamlessly to all surfaces that will encounter water, such as floors and walls, thereby forming a reliable barrier.
Tiling: Creating a Seamless and Spacious Feel
When it comes to tiling, large-format tiles have become increasingly popular due to their aesthetic appeal and ability to create a spacious feel. However, installing large-format tiles requires specialized handling techniques.
Here are some key considerations for a successful installation:
- Prepare the substrate: Ensure that the surface where the tiles will be installed is level and clean. Any imperfections or debris can affect the final result.
- Use a levelling system: To achieve an even finish and eliminate any lippage (unevenness between adjacent tiles), consider using a levelling system during installation. This will help create a professional look.
- Incorporate mitred edges: For an eye-catching aspect, mitred edges can be used. This technique not only enhances the visual appeal but also provides a seamless transition between tiles, adding to the overall waterproofing of the wet room.
Fixtures: Defining Functionality and Style
Alongside quality tiling, the selection of fixtures is paramount in defining the functionality and style of the wet room. Fixtures such as taps, showerheads, and lighting must be chosen based on both design preferences and efficiency.
Consideration should be given to the material and finish of these fixtures to complement the tiles while maintaining practicality. For example, brushed nickel and matte black finishes are both stylish and resistant to tarnishing, enhancing the room’s durability.
By meticulously selecting and installing tiles and fixtures while prioritizing waterproofing measures, you can ensure that your wet room not only looks stunning but also functions effectively for years to come.
A Transformed Bathroom: Lessons Learned
Renovating a bathroom can be a big task with its own set of challenges and surprises. The journey from tearing down the old to putting in the new teaches us valuable lessons about how to do things right.
Planning is Key
Before anything else, it’s important to plan carefully. By looking at the layout, we can figure out how to use the space effectively while still making sure the bathroom works well. A good design takes into account important features like storage solutions and accessibility, making it easier for everyone to use.
Demolition: Exciting but Cautious
Tearing down the old bathroom is one of the most exciting parts, but we have to be careful too. Knowing how the plumbing and electrical systems are set up helps us avoid any surprises later on, making it easier to install everything new.
During this stage, we also realise how important it is to choose high-quality materials. For instance, picking waterproof and durable products ensures that our renovations last longer and reduces the need for repairs in the future.
Bringing in Experts for Unique Touches
As we move forward with the renovation, bringing in third-party installations adds a special touch to the space. Working with experts for tasks like tiling or glass installations can create stunning results that enhance the overall look without sacrificing functionality.
The combination of beautiful finishes and smart design creates a perfect balance that makes using the wet room even better.
Final Touches: Creating an Inviting Atmosphere
After everything is installed, paying attention to small details becomes crucial. Think about using different lighting options and carefully selected decor pieces to create a cozy atmosphere. These finishing touches have the power to transform even a small bathroom into an impressive retreat.
Lessons Learned
Every step of this renovation journey has taught us valuable lessons:
- The importance of planning strategically
- The significance of using high-quality materials
- The value of seeking professional help when needed
These lessons can make all the difference between having an average bathroom and achieving a beautifully renovated wet room.
Lasting Satisfaction
This experience not only improves our living space but also brings us long-lasting happiness. By reflecting on each stage of this project, we can approach our next renovation with more confidence and understanding.
Before and After: A Stunning Transformation
Renovating a bathroom can be incredibly rewarding, especially when the transformation is as dramatic as in the case of a wet room renovation.
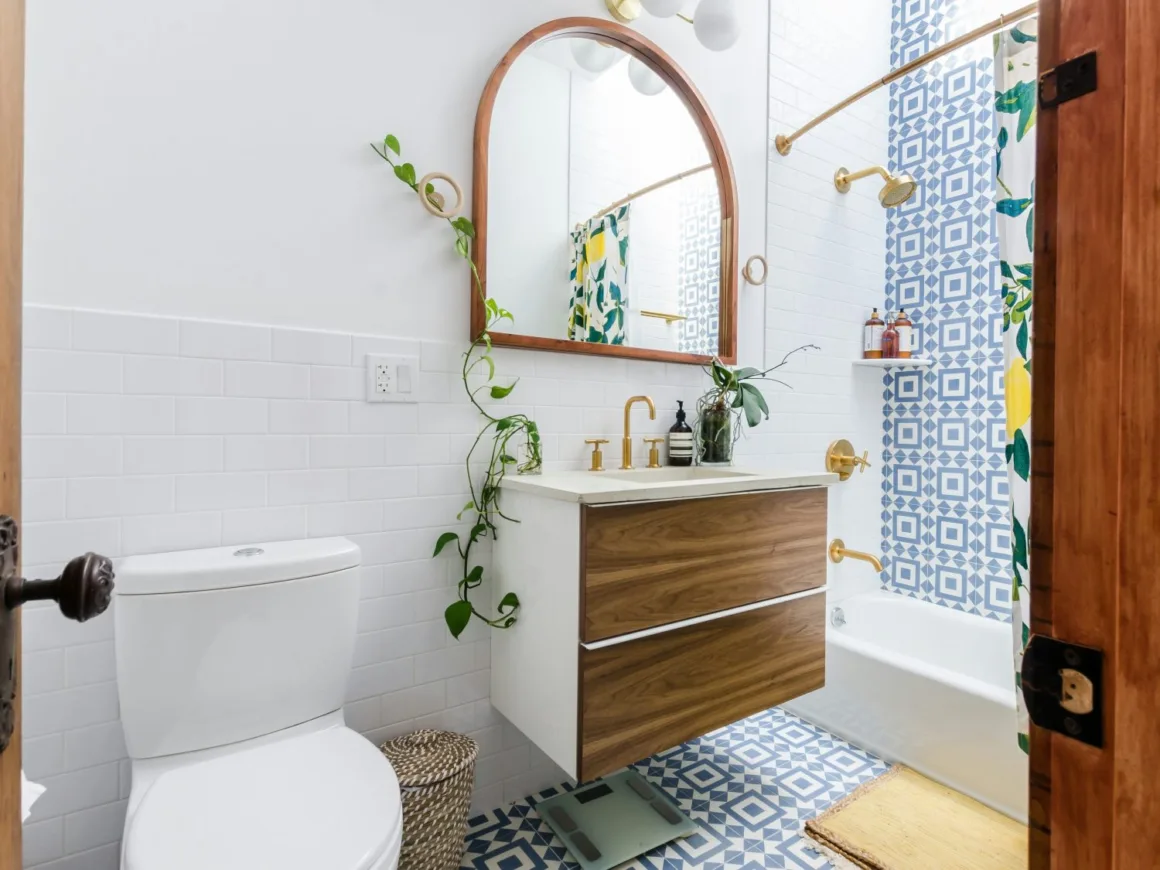
The initial phase often reveals a space that is outdated, dysfunctional, or lacking in aesthetics. In contrast, the completed project can exhibit a harmonious blend of modern design and practical functionality.
Through the use of strategic planning and skilled craftsmanship, even the most uninspired bathrooms can be revitalized into elegant wet rooms that cater to the both visual and functional needs of the users.
The Original Space
Consider the original space, which may have featured dated tiles, a cumbersome bathtub, and ineffective lighting. Such a setting might feel cramped and lacking in tranquillity, undermining the primary purpose of a bathroom as a serene escape for self-care.
The Transformation Process
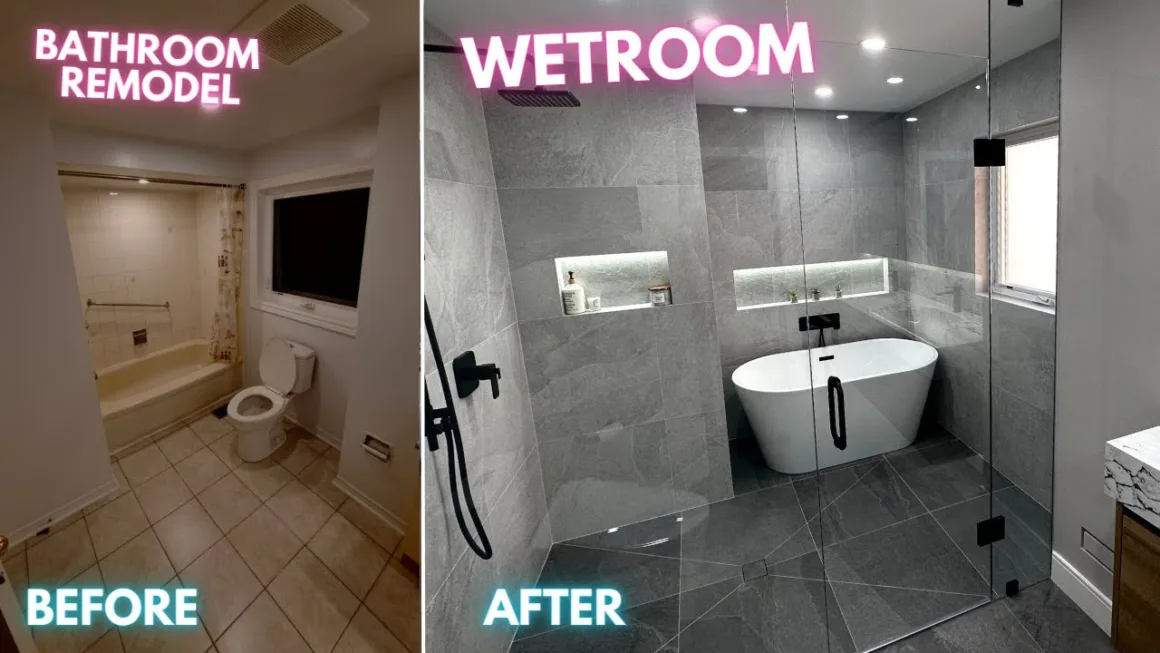
When transforming such a space into a wet room, the emphasis is placed on creating an open, airy environment that maximizes both layout and design. As seen in the before and after images of this renovation, the application of contemporary materials, thoughtful colour palettes, and innovative features led to a remarkable upgrade.
The Result
The after images reveal a strikingly different setting, where the lines between practicality and luxury are beautifully blurred. The use of floor-to-ceiling tiles not only enhances the visual appeal but also simplifies cleaning and maintenance.
A walk-in shower, combined with chic fixtures and ambient lighting, creates a spa-like oasis. The elimination of barriers fosters an inviting flow in the room, making it an ideal spot for relaxation.
Overall, the stark contrast between the pre-renovation and post-renovation images illustrates just how impactful a well-executed bathroom renovation can be.
Project Cost Summary and Budget Breakdown
Renovating a bathroom, especially when changing a regular layout into an impressive wet room, needs careful financial planning. It’s essential to understand the costs involved in the project to keep the renovation within budget while achieving the desired level of luxury and functionality.
The financial aspects can vary greatly based on factors like location, materials, and labour costs, which can differ between Canada and the US.
Key Areas of Project Costs
The overall project costs usually fall into several main categories:
- Demolition
- Plumbing and electrical work
- Materials
- Fixtures
- Labour
On average, homeowners can expect to spend anywhere from $10,000 to CAD 25,000 for a complete wet room renovation, while in the United States, costs may range from $8,000 to USD 20,000. High-end materials or custom solutions can increase expenses further, highlighting the importance of careful material selection and scope management.
Understanding Budget Allocation
Here’s a general breakdown of how you should allocate your budget for a wet room renovation:
- Labour (20-30%): This includes skilled tradespeople required for tasks like plumbing, wiring, and tile installation.
- Materials and Fixtures (40-50%): Set aside this portion for high-quality materials and fixtures as they significantly influence the wet room’s look and functionality.
- Contingency Fund (10-15%): It’s wise to keep this amount aside for any unforeseen costs that might arise during the renovation.
Tips for Balancing Cost and Quality
To strike a balance between cost and quality:
- Source materials from local suppliers.
- Explore discounted or second-hand options.
- Obtain multiple quotes from contractors.
These strategies can help foster competitive pricing and assist in sticking to your budget.
By implementing thorough financial planning and making well-informed decisions, homeowners can create a beautiful wet room without going over their budget.
Conclusion and Call to Action
Transforming a traditional bathroom into a stunning wet room is a multi-faceted process that requires careful planning and execution. Throughout this guide, we have underscored the importance of understanding your space, setting a realistic budget, and selecting materials that blend both functionality and aesthetics.
A successful renovation hinges on thorough research and thoughtful design choices, ensuring that each element contributes to the overall harmony and usability of your new wet room.
Engaging professionals with expertise in bathroom renovations can significantly alleviate the stress associated with the remodel. Their knowledge can provide invaluable insights into layout optimization, waterproofing techniques, and the best available fixtures.
Additionally, considering eco-friendly options for materials and fixtures can enhance your wet room’s sustainability, allowing for energy efficiency and reduced water usage, which are becoming increasingly relevant in today’s climate-conscious society.
As you embark on this exciting renovation journey, remember that your vision is the blueprint of your bathroom transformation. Allow yourself to explore design inspirations that resonate with your style while keeping functionality at the forefront.
FAQs
What is a wet room, and how does it differ from a traditional bathroom?
A wet room is a modern bathroom design where the shower area is incorporated into the overall space without a shower enclosure. This seamless integration creates a spacious and luxurious feel, allowing for enhanced functionality and aesthetics compared to traditional bathrooms with separate shower stalls.
Why should I consider renovating my bathroom into a wet room?
Transforming your bathroom into a wet room can significantly improve its functionality and aesthetic appeal. A well-designed wet room maximizes space, promotes relaxation, and can increase your home’s value. It also offers easier accessibility, making it suitable for all family members and guests.
What are the key steps involved in a bathroom renovation?
The key steps in a bathroom renovation include:
Planning and Design: Assess your needs, set a budget, and create a layout.
Material Selection: Choose durable and stylish materials that complement your vision.
Demolition and Preparation: Remove old fixtures and prepare the space for new installations.
Installation: Install plumbing, electrical systems, and flooring, followed by fixtures like sinks and toilets.
Finishing Touches: Add elements such as lighting, mirrors, and décor to complete the transformation.
How do I choose the right materials for my wet room?
Selecting the right materials for your wet room is crucial for both functionality and style. Look for water-resistant options such as porcelain tiles, natural stone, and specially designed waterproof membranes. Ensure that your choices align with your design aesthetic while providing durability and ease of maintenance.
Can I undertake a bathroom renovation on my own, or should I hire professionals?
While some aspects of a bathroom renovation can be DIY projects, hiring professionals is often recommended, especially for plumbing and electrical work. Professionals bring expertise and experience, ensuring that the renovation is completed safely and efficiently, resulting in a stunning wet room transformation.
What are some design tips for creating a luxurious wet room?
To achieve a luxurious wet room, consider these design tips:
Use large-format tiles to create a sense of space.
Incorporate natural light with skylights or frosted glass.
Choose high-quality fixtures and finishes for a polished look.
Add built-in storage solutions to keep the space organized.
Integrate features like heated floors and rainfall showerheads for added comfort.
How long does a bathroom renovation typically take?
The duration of a bathroom renovation can vary based on the project’s complexity. Generally, a standard renovation may take anywhere from 2 to 4 weeks. More extensive renovations, particularly those involving structural changes, may require additional time.
What budget should I expect for a bathroom renovation?
The budget for a bathroom renovation can vary widely depending on the scope of work, materials chosen, and labour costs. On average, homeowners can expect to spend anywhere from $10,000 to $30,000 for a mid-range wet room transformation. It’s essential to establish a clear budget early on to guide your choices throughout the process.
How can I ensure my wet room is accessible to all users?
To create an accessible wet room, consider features such as a curbless shower entry, grab bars, and adjustable shower heads. Ensure that the layout allows for easy movement and includes non-slip flooring for safety. Thoughtful design can make a wet room comfortable and functional for everyone.
What are the benefits of investing in a bathroom renovation?
Investing in a bathroom renovation can yield numerous benefits, including increased home value, enhanced comfort and usability, improved energy efficiency, and the opportunity to create a personal sanctuary. A beautifully designed wet room can transform your daily routine into a luxurious experience.