• DIY
    • Crafts
    • Woodworking
  • Home Improvement
    • Home Building & Design
    • Decorating
    • Remodeling
    • Furnitures
    • Bedroom
    • Kitchen
    • Bathroom
    • Floors
    • Real Estate
  • Gardening
    • Landscaping
  • Finance
TimewornLit.com
  • DIY
    • Crafts
    • Woodworking
  • Home Improvement
    • Home Building & Design
    • Decorating
    • Remodeling
    • Furnitures
    • Bedroom
    • Kitchen
    • Bathroom
    • Floors
    • Real Estate
  • Gardening
    • Landscaping
  • Finance
Steps to Master Diagonal Tiling
  • Home Improvement
  • Remodeling

Steps in Diagonal Tiling: Easy Guide to Tile Floor Design DIY Layout & Installation

  • October 12, 2022
  • 3 minute read
  • Perla Irish
Table of Contents Show
  1. Steps to Master Diagonal Tiling
  2. Diamond or Diagonal Tile Patterns
  3. Centering the Pattern
  4. Layout Pattern on Chalk-Lines
  5. Cut and Lay Tiles in Mortar
  6. Continue Tiling
  7. Helpful Hints
    1. References
Steps in diagonal tiling start with where to begin, and how to get the diagonal pattern centered in the room for the best use of the tiles, the least waste, and a professional-looking installation without fancy lasers and a lot of complicated measuring or calculations. Installing tile patterns does not have to be hard. Helpful diagrams and images accompany the easy-to-follow instructions.

Steps to Master Diagonal Tiling

The steps in diagonal tiling start by finding the room center with a tape measure and snapping chalk lines. Put the first tile in the center and work to the back of the room. Determine cut tile sizes, snap additional chalk lines, and begin laying tile in the far left corner of the room entrance

Diamond or Diagonal Tile Patterns

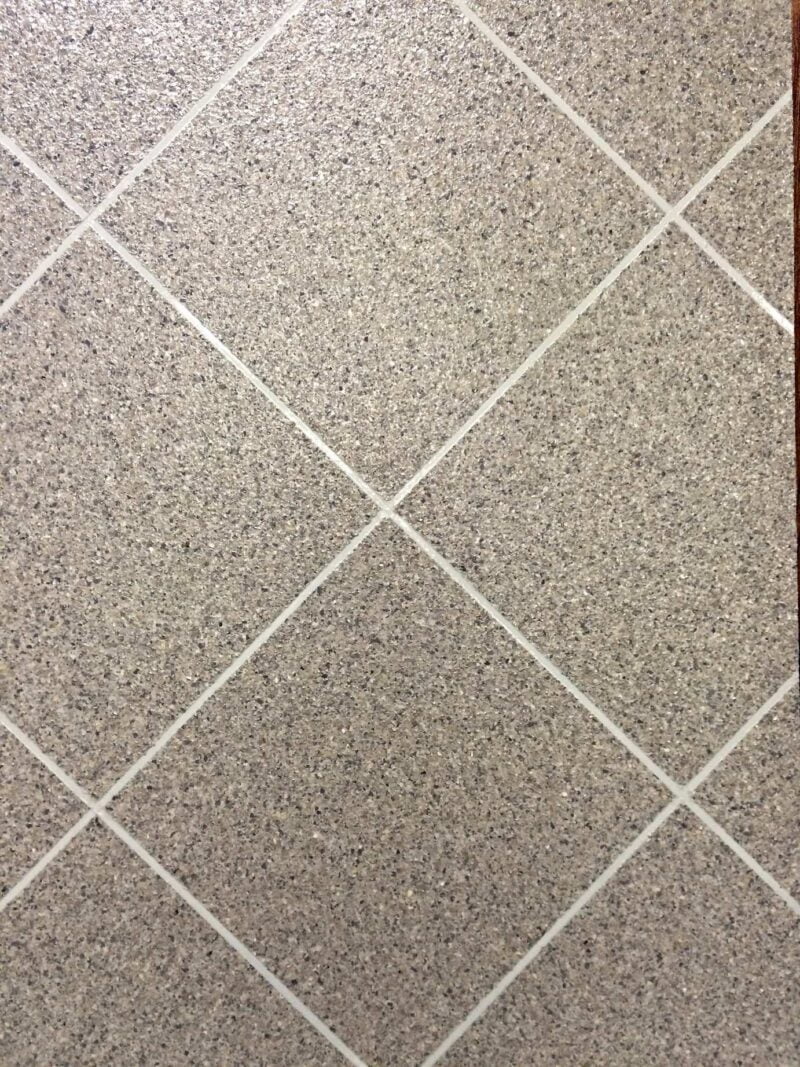
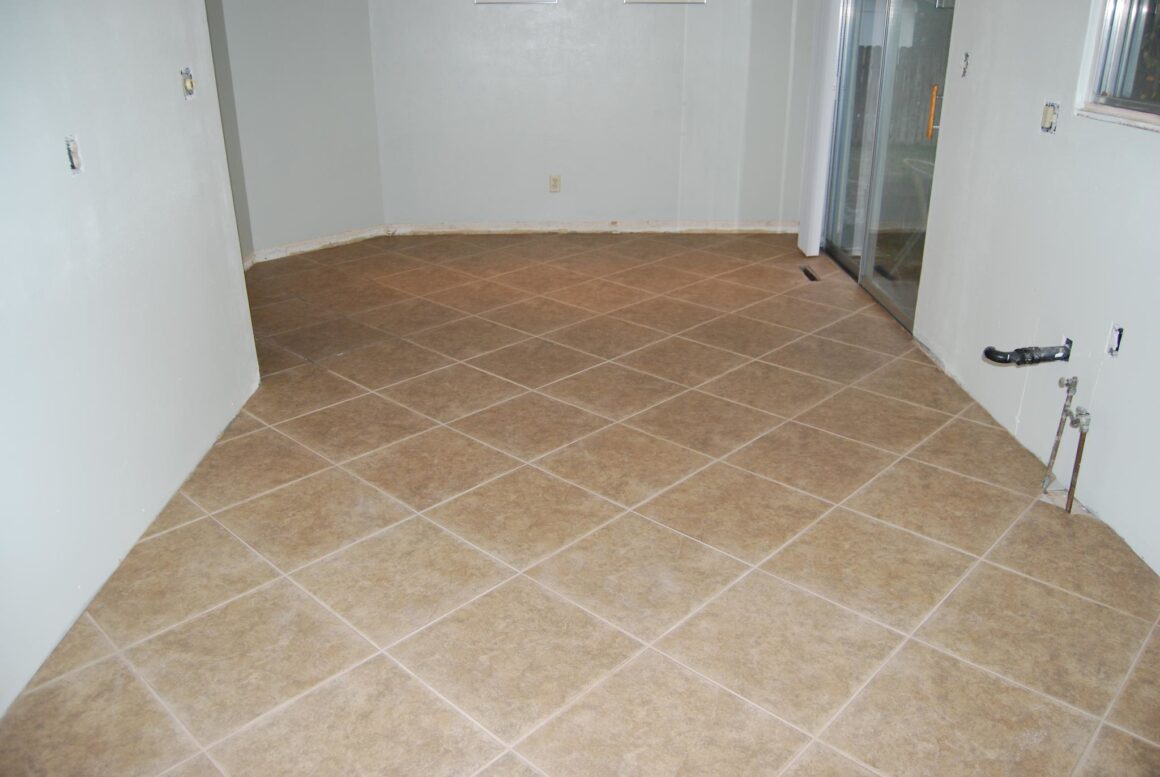
A diagonal tile pattern

Diagonal patterns are popular floor tile designs, whether it’s in the kitchen, or even to tile your entryway. Executing the steps in diagonal tiling is somewhat more challenging than a simple rectangular layout.

The rows and columns of diagonal tiles should be centered on a single tile at, or near, the exact center of the room. Working from the exact center, all the perimeter tiles will be the same size.

By shifting the central tile up to half a tile off-center, you can change the size of the tiles in doorways and along walls for a pattern that displays the most tiles.

Centering the Pattern
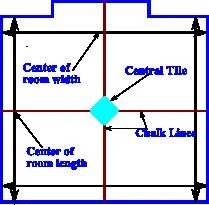
Center the first tile in the room

Measure across the width of the room at both ends and mark the center point of the width. Snap a chalk line between the two center points. Ideally, the distance from the chalk line to the walls, on either side, will be a multiple of the total tile diagonal, resulting in fewer cut tiles.

Repeat this step for the length of the room, and snap a second chalk line across the room width.

Layout Pattern on Chalk-Lines
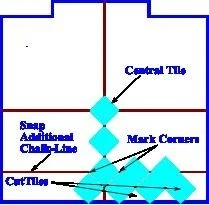
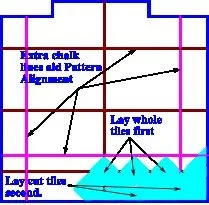
Extend the pattern along the chalk-lines

Do a dry layout of the tile design, beginning by centering a tile at the intersection of the two chalk lines, with the corner points resting on the lines. Lay additional tiles left and right, front to back, to build a single column and single row of tiles.

Use tile spacers between the corners to keep proper spacing. Shift the tile positions until you are satisfied the layout represents the best positioning of the diagonal pattern of tiles.

Mark the new corner positions of the central tile and snap new chalk lines in a different color. At the wall opposite the entrance, mark the corners of the tile there, and snap two more chalk lines across the width.

A light coat of cheap hairspray will keep chalk lines from being ruined as you work. Mark the positions of the chalk lines on the walls about an inch off the floor for reference. Once the lines are covered with mortar, these marks will help keep you on track.


Read Also:

  • Decorating Styles: Discover Which Home Style is Right for You
  • Bathroom Repairs: Renovating Your Bathroom

Cut and Lay Tiles in Mortar

Lay the First Tiles
Lay the First Tiles

Mix your mortar and begin laying the tiles. Spread mortar with a notched trowel, beginning on the wall opposite the entrance from the room centerline, at the wall opposite the entrance, and about three tile widths to the left.

Lay the first tile on the centerline, aligning with the chalk lines placed previously. Measure and cut tiles for the spaces between the wall and the first row of tiles.

Continue until you reach the far left corner. Repeat for the right side of the room. Reaching this step in diagonal tiling is a milestone. Keep cutting tiles for the sides as you fill in the center, and work out towards the room entrance.

Continue Tiling
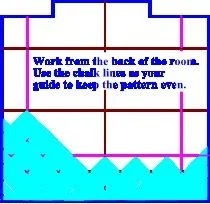
Fill in the Pattern
Fill in the Pattern

Remember to seat the tiles consistently and keep them level. Use a long straight edge, or four-foot level, to keep them even with each other.

Place spacers at the tile corners to maintain the correct distance between tiles; this will also help keep the rows and columns even and straight. A 1/4 inch gap between the wall and your tiles provides room for expansion and contraction as the seasons’ change.

Helpful Hints

Finish the Pattern
Finish the Pattern

Compared to other tile flooring designs, the steps in diagonal tiling require a fair amount of cutting along the sides of the room, and cutting tile diagonally is more difficult than cutting tiles square.

For laying tiles, the best method uses two people; one cutting the tiles as needed and another laying them as they are cut. In large rooms, adding additional chalk lines at intervals is helpful in keeping the pattern perfect.

References

  • “Floors and Stairways”; Time-Life Books; 1995
  • “Kitchens: Design – Remodel – Build”; Creative Homeowner; 1998
Total
7
Shares
Share 0
Tweet 0
Pin it 7
Perla Irish

Perla Irish, who is more familiarly known as Irish, is the Content Manager at timewornlit.com. She loves following trends around home and garden, interior design, and digital marketing. Through this blog, Irish wants to share information and help readers solve the problems they are experiencing.

Related Topics
  • floors
  • pattern
  • room
  • steps
  • tiles
  • walls
Previous Article
How to Decorate a Round Coffee Table
  • Decorating
  • DIY
  • Furnitures
  • Home Improvement

Tips to Beautifully Decorating a Round Table

  • October 9, 2022
  • Perla Irish
View Post
Next Article
  • Decorating
  • DIY
  • Home Improvement

Classic and Traditional Home Decorating Ideas for Any Home

  • October 13, 2022
  • Perla Irish
View Post
You May Also Like
Bright porch ceiling with light blue geometric patterns, rustic faux wooden beams, modern ceiling fans, cozy furniture, and soft natural lighting.
View Post
  • Home Improvement
  • Remodeling

Easy DIY Projects to Refresh Your Porch Ceiling Without a Full Renovation

  • Perla Irish
  • May 10, 2025
ceiling fan on windowless living room
View Post
  • Home Improvement
  • HVAC

Simple Ways to Create Air Flow in a Windowless Room

  • Perla Irish
  • April 2, 2025
Contemporary living room with stylish sofa, TV, and staircase, offering a cozy interior design setting.
View Post
  • Decorating
  • Home Improvement

Easy Ways to Hide TV Wires Without Cutting into Walls

  • Perla Irish
  • February 24, 2025
A couple collaborating on installing a dimmer switch in a modern dining area.
View Post
  • Appliances
  • Home Improvement

Installing Dimmer Switches Without Hiring an Electrician

  • Perla Irish
  • February 5, 2025
Two children cleaning their shared bedroom, filled with bright bedding and toys, with a window showing a sunny day outside, emphasizing the importance of sharing responsibilities.
View Post
  • Home Improvement

14 Cleaning Jobs Your Kids Could Be Doing

  • Perla Irish
  • January 30, 2025
An urban rooftop workshop where a woman are collaborating on tire ottomans.
View Post
  • Decorating
  • Home Improvement

10 Upcycling Hacks to Turn Junkyard Finds into Unique Home Decor

  • Perla Irish
  • January 24, 2025
Repair scratches on Formica countertops
View Post
  • DIY
  • Home Improvement
  • Kitchen

Expert Guide to Repairing Formica Countertops at Home

  • Nugroz Stone
  • January 20, 2025
Transform your space with thrifted treasures.
View Post
  • Decorating
  • Home Improvement

Creative Ways Professional Organizers Use Thrift Store Items

  • Perla Irish
  • January 17, 2025

Leave a Reply Cancel reply

Your email address will not be published. Required fields are marked *

This site uses Akismet to reduce spam. Learn how your comment data is processed.

Subscribe

Subscribe now to our newsletter

  • Privacy Policy
  • Disclaimer
  • Sitemap
  • Contact
  • About

Input your search keywords and press Enter.